Coursework Techniques
Lighting
- Soft frontal light is the FILL LIGHT
- Stronger more directional light from the back BACKLIGHT
- You can arrange the lights in such a way as to leave darkness between the area illuminated by the backlight and the area illuminated by the fill light, depending on how moody you want the shot to be.
- Shoot in order of lighting set ups to save time
- Can use different light colours in the same shot
- 1. Avoid placing your key light close to the camera. It will cause your lighting to become flat and featureless.
- 2. If a key light is positioned to the side or back of an actor, it will create a mysterious/dramatic mood, and overall keep the image dark.
- 3. A key light is the primary light in a three-point lighting setup
- FILL LIGHT -A fill light illuminates the shadows that are created by the key light. A fill light is usually placed on the opposite side of the key light, and often not as powerful as the key. As the primary function of the fill is to remove shadows created by the key, it’s important that the fill remains indistinctive and does not create shadows or it’s own characteristics. The closer the fill light is to the camera, the less shadows it will create.
- 1. Fills are easy to create even if you don’t have another light at hand; you can place a reflector on the opposite 3/4 to the key. Light will spill onto the reflector and bounce up to your subject.
- 2. A fill light is measured in a fill light ratio also known as a key/fill ratio. It describes the relative amount of light from the key and the fill. For example, a ratio of 1:2 would indicate that the fill is half the intensity of the key.
BACK LIGHT- A back light hits an actor or object from behind, and is usually placed higher than the object it is lighting. A backlight is often used to separate an object or an actor from a dark background, and to give the subject more shape and depth. Backlighting can help bring your subject out and away from looking two dimensional.


Butterfly Lighting- Butterfly lighting created a butterfly–like shadow just beneath the subject’s nose. The light source should be behind and above the camera when using this technique.


- 1.Non-diffused sunlight can often be too harsh to light your subject as a key light, but as a backlight, the sun can make your subject stand out. With the sun as a backlight, you can use a reflector or a foam board to bounce the sun at a lesser intensity back up to the actor.
- 2.To create a silhouette, expose for the backlight and remove your key and fill.If a backlight is placed behind an actor at a directional angle, where the light hits part of the face, the backlight becomes a kicker.
- 1.To create better dramatic lighting with a sidelight, it is best to use it without a fill or have the fill ratio very low such as 1:8.
- 2. Sidelights are ideal for revealing texture.
- 1.Practical lamps were a big part of classic Hollywood films. Take the above image from Goodfellas for example. The lamps are a major source of illumination, and they also increase the depth of the scene.
- 2.Common practice for practical lighting is for the lights to have a dimmer of some sort.
- 1.Foam bead boards have a matte surface and will create the softest bounce light.
- 2.Reflectors with silver reflective material can create a hard light and often provide bounce light at 3/4 of the intensity back, depending on the distance of the light itself.
- 3.Bounced light in the form a reflector can be very versatile. You can create a key, fill, backlight, and even illuminate objects in the background with reflective material.
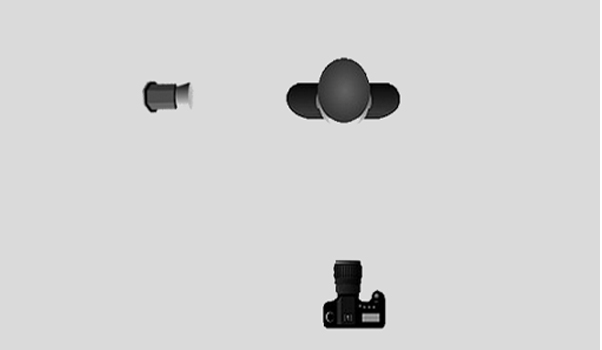
Split Lighting- To achieve this effect simply illuminate one half of your subject’s portrait and take the picture straight on. One of the things that you can do to emphasize your photo’s split lighting effect is to look for a line down the center of the subject’s face. Since the light source is positioned 90 degrees from the subject’s face, you should see the line. If not, then your subject may have moved.


Butterfly Lighting- Butterfly lighting created a butterfly–like shadow just beneath the subject’s nose. The light source should be behind and above the camera when using this technique.


Comments
Post a Comment